
There comes a time for more ambitious young flute players when they need more flute than their beginner instrument can provide. They need a better headjoint to continue to develop their tone, a lighter mechanism for more technical facility and open holes both for sound and to be able to play more advanced literature. What frequently happens when a student gets a step up instrument however, is they play their new flute with plugs in the holes and never fully make the transition to open holes.
First off, let me say there really isn’t a right or wrong way to introduce playing with the holes open. It really depends on the student. If you have a kid who has good basic hand positions where their fingers are gently curved and centered over the keys, the transition will be relatively quick and painless. You can recommend they go ahead and try playing without the plugs right away and see how they do. Some kids do this quickly and pretty painlessly. They experience a few days of having a little trouble covering everything, but also have a developed enough sense of observing themselves to figure what they need to cover every hole accurately.
It can be more complicated if the student is bracing the flute against the rods with the thumb in front on the right hand or their left wrist is in front of the flute and left fingers straight and on the edges of the keys. What’s great about getting a new flute with open holes is that it is an opportunity for students to develop better hand positions, provided they are properly supervised and encouraged. With a kid like this, I think it is better to gradually wean them off the plugs one at a time. Give them a week per plug to adjust. And slowly you will see that their hand positions improve as they learn to cover each new hole.
What order do I recommend for removing the plugs? F key, A key, E key and then either of the fourth finger keys, D key and G key. The last two are by far the trickiest. It’s actually not such a big deal if the student never takes either of the last two out. A lot depends on the size and shape of the fingers and palm of the hand. Another factor is whether the flute has an inline G or offset G. It is generally easier to learn to cover the G key hole with an offset G.
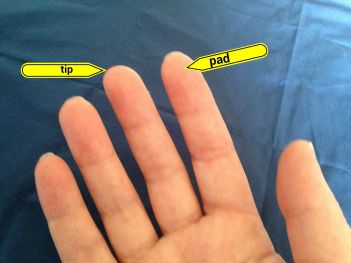 Finally, encourage your students to use the pads of their fingers to cover the holes rather than the tips. There is much more flesh to cover the hole on the pads of the fingers. If students are trying to use the tips of their fingers, it is going to cause a lot of hand position and balance issues. Make sure the headjoint is aligned between the keys and the rods. Check that the right hand is behind the flute with the thumb under and somewhat behind the flute. The left wrist should be under the flute, not in front and the thumb should be open to the rest of the hand and relaxed. It will likely mean that the thumb engages the thumb key closer to the first knuckle than the tip (that is why the Bb key arm is recessed on most flutes as it travels above the B key).
If you find these entries useful, please subscribe, share with your colleagues and come back regularly for more flute tips. Feel free to comment. If you have a topic you would like to see explored more fully, you can contact me via IM/Messenger on Facebook or email me at dr_cate@sbcglobal.net. For information about clinics and workshops click here.

I’m a clarinetist who came to gawk… I mean, learn more about other woodwind instruments. I definitely love flutes enough to seriously think of giving it a try, the tone production and octave switching techniques just scare me a bit.
Anyway, the question is, if most flutists seem to agree that open holes are better (or at least I haven’t heard anyone say it’s worse), why are student flutes invariably have closed holes?
Bb/A and Eb clarinets always have open holes and beginners still learn it successfully, and it encourages a good hand position since if it’s not good, then you squeak or notes respond poorly. I suppose the clarinet being a rather “fail deadly” instrument may be discouraging for the less dedicated beginners, but a flutist could easily fall back to plugging the holes if open holes drive them to the edge of quitting lessons.
LikeLike
This is conjecture based on experience. It is a big issue for youngsters to learn to balance the flute in their hands, as well as learn to finger and blow properly. See my article, It’s All About Balance. There aren’t the balance issues in learning to play the clarinet. The clarinet takes care of itself in this respect. Learning to balance the flute, compounded by having to cover the holes would be a lot for a kid to deal with. Switching to a flute with open holes can be a major challenge, one that a lot of kids (especially kids that don’t have a private instructor) avoid even after they get a step up flute by continuing to use plugs indefinitely. For a kid who is playing in band for the fun of it, it is not a huge issue. For a student that demonstrates greater aspirations and wants to continue with the flute, I steer them toward weaning themselves off the plugs as soon as possible to avail themselves of the tone and technical advantages of having the open holes.
There have also always been both makers and players who advocate closed hole flutes forever. My understanding is that there is a difference in the schematic of the instrument that affect pitch. Apparently a closed hole flute needs a slightly different scale to play equally well in tune. Some people play closed hole flutes to accommodate an injury or just because they prefer it. I’ve even seen flutes made with one hand closed hole and the other hand open hole. A comprable to open/closed holes on flutes could be clarinetists and their ligatures/mouthpieces/barrels.
LikeLike
Some really good observations about flute vs. clarinet. I think perhaps the difference is that flutists have a balance issue in addition to having to cover the holes. You absolutely have to be able to balance the flute between your hands and have good hand positions to even have a prayer of covering the holes.
We would probably need to ask the manufacturers about why there have always been two tiers of flute, closed hole and open hole and the whole beginner vs. advanced player issue to get some insight as to why they started basically designating closed holes for beginners.
LikeLike
i just bought a open hole flute and one of the plugs fell out and i dont know how to adjust my fingers to the holes any suggestions on how to do it?
LikeLike
If you wish to play without a plug or several plugs, it is important to keep in mind that we used the pad of our finger rather than the tip. There is more flesh on the pad of the finger than at the tip. This means that your finger will lie more flat on the hole. If you are uncomfortable or don’t want to play without plugs, the plugs are very inexpensive. You can get replacement plugs at any music store that sells band instruments or even order them online. Look for silicon flute plugs. They are the easiest to install and remove and are flush with the hole. Hope that helps.
LikeLike
Thank you for the article on the sequence of removing plugs.
I would love to see an article on ways to utilize open holes. And techniques for portamento, such as the opening clarinet solo in Rhapsody in Blue (perhaps transposed to the key of F to be more in a flute range).
Or utilizing shaded holes for playing Blues.
When do you bend a note using embouchure, rather than using fingers over shaded holes?
LikeLike
Hi David, thank you for your comment. While your inquiry goes beyond the purpose and scope of my blog, which is what school music teachers need to know about teaching flute, let me recommend you to Steve Kujala and his page entitled fretless.com. He has lots of information and demonstrations of finger portamento in a variety of styles. For myself, my preferred method of bending pitch is with my embouchure, but then my primary expertise is as a classical flute player, rather than jazz.
LikeLike
Pingback: Best 21 Open Hole Vs Closed Hole Flute - Học Điện Tử Cơ Bản