• About
  • Clinics and workshops
  • Dr. Cate’s Calendar

Dr. Cate's Flute Tips

~ Flute pedagogy for school music directors

Dr. Cate's Flute Tips

Category Archives: embouchure

Dr. Cate’s Flute Camp goes Virtual

04 Monday May 2020

Posted by Dr. Cate Hummel in beginners, embouchure, flute maintenance, Flute posture, intermediate skills, intonation, Musicianship, Posture, technique, vibrato

≈ Leave a comment

Tags

flute camp

We’ve been doing Dr. Cate’s Flute Camp the old-fashioned way for 20 years in a school, at a music dealer, in person. Now due to the world being a completely different place since March, Dr. Cate’s Flute Camp is going virtual. And you know what? I’m really excited for this new opportunity to help keep students playing their flutes, give them some ensemble experience, explore the basic skills of good flute playing, learn about different types of flutes from around the world, and learn how to properly take care of their instruments.

Instead of the full day format we’ve had in the past, we are condensing the instructional part of the day down to two hours. During the course of each one week camp, each student will also get a 30 minute lesson from one of our highly qualified staff. We are also expanding the number of available sessions to three for junior high students and three for high school students, starting the week of May 18.

If you or your students can benefit from an online camp experience over the summer, go to fluteline.com and follow the links to Dr. Cate’s Flute Camp and the easy online registration. You can read all about our award winning staff and learn more about our camp activities. Price for each session is only $100.

Taming the Beast

12 Sunday Nov 2017

Posted by Dr. Cate Hummel in embouchure, intonation, piccolo, tuning

≈ 1 Comment

Tags

embouchure, flute pedagogy, piccolo

Intonation on Piccolo

Over the last few weeks, students have been asking me for help with piccolo. For such a diminutive instrument, pitch awareness and placement is a huge issue. It might even be the biggest issue because so much of what we know about playing the flute translates directly to piccolo. Here are a few tips to help your students play better in tune on piccolo:

  • Make sure the piccolo the student is playing is in good repair. In my experience, school piccolos are notorious for being in the worst condition of any instruments in the storage locker. They have shredded pads, bent keys, plating flaking off the keys…you name it. They rarely see the inside of a repair shop and often are unplayable.img_3254
  • Check the headjoint cork placement. This is probably the #1 problem with student flute players playing piccolo out of tune. Make sure to use a piccolo cleaning rod for the correct measurement. The line should be in the middle of the blow hole.
  • Have the cork replaced if it moves easily. A leaking cork will cause a lot of pitch problems.
  • Be sure that your piccolo players have the most stable and developed embouchure in your ensemble. They need to know how to correct pitch and use their air properly on flute to know how to begin to explore piccolo without causing more problems than they solve.
  • You need to put the piccolo a little higher on your lip than the flute. Because of the small size, issues of placement are magnified. In other words, smaller adjustments will mean larger changes in pitch and tone quality
  • Playing octaves will teach the student what in tune means on the piccolo. The pitch tendencies are a bit different than flute. This is especially noticeable in the notes just above the staff like Bb, B, C, C# and D. This can also be the case with long notes on the staff like D, Eb and E. Another way to practice pitch is by using a tone generator and playing intervals like perfect 4ths and 5ths against the drone.
  • Make sure to make adjustments by moving your lips independently. Rolling your bottom lip out will raise the pitch, using your top lip to angle the air down will lower the pitch just as on flute. The movements are more subtle and require you listen carefully.
  • If rolling the instrument to adjust pitch is a bad idea on flute, it is an even worse idea on piccolo. Remember, everything, both good and bad, is magnified on the piccolo. You could even say, “less is more”. A smaller change makes a bigger difference.

As always, if you find these entries useful, please subscribe, share with your colleagues and come back regularly. Feel free to comment. If you have a topic you would like to see explored more fully, you can contact me via IM/Messenger on Facebook or email me at dr_cate@sbcglobal.net. For information about clinics, workshops and performances, click here.

To “Tut” or Not to “Tut”

12 Sunday Mar 2017

Posted by Dr. Cate Hummel in articulation, embouchure

≈ Leave a comment

Tags

articulation, blowing, flute pedagogy

As I frequently tell students, the tongue is used to start a note, rarely, if ever to end a note. So if there is a distinct “T” sound on the release, you are going to have some really nasty sounding note endings. Not to mention big problems single tonguing any faster than moderately slow. All that tongue noise from the tongue flailing around in your mouth isn’t tone. Or as my teacher Tom Nyfenger was wont to say, “Tonguing is the anti-tone”. Related to the tongue stop is the jaw drop release, which will slow you down even further. In both cases, you will get a distinctive popping sound on the release.

If you hear a popping sound on the release, the first thing to determine is how the popping sound is being produced. It’s either going to be because of a “tut” style of tonguing or by dropping the jaw to end the sound. If you discover any other methods of creating this kind of release, please let me know. How are you going to address and correct this habit with your students? The fastest way is to have them do some kind of articulation exercise without tonguing! I use Reichert Seven Daily Exercises #2 (available on IMSLP), but any kind of scale or arpeggio exercise can be used. Start on an easy key like F, rather than a key that goes really low on the flute like D. Play each note with a forceful puff of air without the tongue. Keep the embouchure in position without opening the aperture after every note. If you observe a chewing type motion with the jaw, the student is involving more resources than are necessary. The less motion the better. Direct the students to think of still/poised rather than rigid. Have the students work on placing the air precisely for best tone on each note without the tongue. Learning to do this takes some practice and determination, because it requires real precision of placement for the best sound in every part of the flute. When you reintroduce the tongue, make sure the tongue is only involved in starting the note, not ending it. Also be sure to continue having the strong puff of air with good placement behind the tonguing. There are many additional ways you can vary up the exercise with different rhythmic patterns in all keys. Here’s a link to a video I did on various ways to practice good placement and tonguing.

As always, if you find these entries useful, please subscribe, share with your colleagues and come back regularly. Feel free to comment. If you have a topic you would like to see explored more fully, you can contact me via IM/Messenger on Facebook or email me at dr_cate@sbcglobal.net. For information about clinics, workshops and performances, click here.

Playing Softly Without Pinching

26 Sunday Feb 2017

Posted by Dr. Cate Hummel in dynamics, embouchure, tuning

≈ 4 Comments

Tags

breath control, dynamics, embouchure, flute intonation, flute pedagogy

Once you have confidence that your students know how to blow with a steady air stream in at least two or more octaves of the flute, it’s time to help them develop a dynamic palette from piano to forte, so they can begin to practice and understand balance and style. How many of you have tried teaching your students to play more quietly only to have a host of weird compensating behaviors magically appear, not to mention having the pitch go haywire? Things like:

  • Pinched aperture, shrill tone and sharp pitch
  • Rolling in/covering to much of the blow hole, dull tone and flat pitch
  • Clenched teeth, tight sound lacking resonance, probably sharp
  • Tight throat, strangled, dull tone and probably flat
  • Slow air resulting in flat pitch, trouble placing and controlling high notes, thin, bleating tone

Ok, so the problem with all of these “solutions” is they miss the point that makes the difference and you wind up with all kinds of compensations that just make a poor situation worse. The point is to understand that there is a difference between the quantity of air and the speed of the air. Youngsters and anyone who doesn’t really ‘get’ flute have trouble conceptualizing the difference between air quantity and air speed. In fact, for kids speed and quantity are the same thing. The way I explain it is that until you understand better, air speed and air quantity function like a bad marriage, needy and codependent. One cannot exist without the other, but to the detriment of the both partners.

In order for a player to be able to control dynamics and pitch, air speed and air quantity need to get a divorce and be able to operate as separate entities. The speed of the air stream has to be maintained (supported) while the quantity of air determines the relative volume of the sound. You need to maintain the air speed/pressure using the abdominal muscles while decreasing the quantity of air you are blowing. Here are a couple other concepts to incorporate into the mix to get good dynamic and pitch control:

  • Maintain the oval shape of the aperture without flattening it out
  • Maintain the position of the flute on your lip without rolling in or out
  • The less air you blow, the more you need to raise the blowing angle towards more straight across the blow hole to maintain pitch
  • Keep back teeth apart and mouth cavity open
  • Keep a relaxed and open throat. Think of how your throat feels right on the edge of yawning
  • Keep the speed of the air, just less air

As always, if you find these entries useful, please subscribe, share with your colleagues and come back regularly. Feel free to comment. If you have a topic you would like to see explored more fully, you can contact me via IM/Messenger on Facebook or email me at dr_cate@sbcglobal.net. For information about clinics, workshops and performances, click here.

Three Essential Skills

05 Sunday Feb 2017

Posted by Dr. Cate Hummel in embouchure, Flute pedagogy for band instructors, intonation, technique

≈ 3 Comments

Tags

dynamics, flute embouchure, flute technique

You already know that blowing on a flute has many variables, maybe a bewildering number of variables. In speaking with a flute playing colleague who is also a band director recently, she told me that busy educators are looking for two or three simple steps they can follow to help their students play their instrument easily. So here are three essential things to communicate to your flute students at every stage of their development:

  1. Find the optimum position for the flute on bottom lip. Do this by bringing the flute up from below to about where lip and chin meet. Avoid rolling down from the center. This places the blow hole too high to get a full, characteristic sound. The Legend of Kiss and Roll, Teaching Great Flute Sound, What is Transit Time
  2. IMG_0146
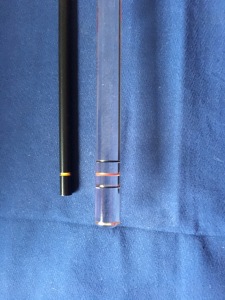
Balance the flute in your hands. Turn the headjoint slightly back to align between the key cups and the rods, rather than directly with the key cups. This puts the relatively heavy rods more on top so the flute can rest in your hands. No bracing needed even with all the fingers off the keys (like with C#-Db). It’s All About Balance, Balance and the Right Hand, Balance and the Left Hand
  3. Shape the blowing aperture enough to focus the air stream and experiment with blowing angle. There is a subtle and intricate balance between top and bottom lip that is always adjusting to change registers, dynamics and control pitch, not to mention create different colors. Independence for Lips!, Warm Air, Cold Air

Try these three pointers with your students. Let me know how it works for you.

As always, if you find these entries useful, please subscribe, share with your colleagues and come back regularly. Feel free to comment. If you have a topic you would like to see explored more fully, you can contact me via IM/Messenger on Facebook or email me at dr_cate@sbcglobal.net. For information about clinics, workshops and performances, click here.

Finding the Sweet Spot

22 Sunday Jan 2017

Posted by Dr. Cate Hummel in embouchure, Flute pedagogy for band instructors, instruments

≈ 5 Comments

Tags

blowing, embouchure, flute pedagogy, flute tone

We all know that sports equipment often has a sweet spot. A baseball bat, tennis racket or skis are good examples of sports equipment with a sweet spot. If you make efficient use of the sweet spot, you maximize the response of the equipment. When you hit a baseball or softball with the sweet spot of the bat, the ball travels much farther than if the ball makes contact with another part of the bat. You have more control over the placement, velocity and spin of a tennis ball using the sweet spot of a tennis racket.

The sweet spot of downhill skis are probably most like the blow hole of a flute headjoint than any other sweet spot in sports. Skis for beginner and intermediate skiers generally have a larger sweet spot and therefore are more forgiving of a skier’s technical weaknesses, but you also sacrifice something in terms of finesse and control on the hill with the larger sweet spot. On the other hand, advanced skis have a narrow sweet spot that gives a lot of control in turns and with speed. However, you need to understand how your center of gravity works in tandem with the skis to benefit from the precise response.

Yes, flute headjoints most definitely have a sweet spot. And like skis, beginning flute headjoints are more forgiving of inexperienced players. Professional headjoints tend to require more precise air direction and placement to maximize the response. If your students have windy tone and/or pitch problems, they simply haven’t learned how to direct the air to maximize the response of the headjoint’s sweet spot.

  • We blow down at about a 45 degree angle at the blowing edge, not really across the blow hole at all, as is so commonly believed.
  • Most flute players are directing the air slightly to their right at the blowing edge. Headjoints are cut in such a way to allow for this. The exception to this is someone with a teardrop top lip who plays off to the right of the teardrop, rather than the more common left of the teardrop.
  • How do you know if someone has hit the sweet spot? The sound is focused, full, round, in tune, has depth and resonance.

Every flute player has to discover their own best blowing angle. There really is no One Size Fits All solution, only general guidelines:

  • Rest the inner edge of the blow hole approximately where chin skin and lip skin meet.
  • Allow no more than 1/4 to 1/3 of the blow hole be covered by the bottom lip.
  • Reach over slightly with the top lip to angle the air down at the blowing edge.
  • Shape lips as if to say the letter “W”
  • Blow through the resulting aperture
  • Experiment, experiment, experiment with all of the above until you discover the best combination for you
  • Practice to make it reproducible, so you can do it every time you put the flute on your face

As always, if you find these entries useful, please subscribe, share with your colleagues and come back regularly. Feel free to comment. If you have a topic you would like to see explored more fully, you can contact me via IM/Messenger on Facebook or email me at dr_cate@sbcglobal.net. For information about clinics, workshops and performances, click here.

Troubleshooting Tone and Pitch Issues

15 Sunday Jan 2017

Posted by Dr. Cate Hummel in beginners, embouchure, Flute pedagogy for band instructors, intermediate skills, intonation

≈ 2 Comments

Tags

beginning flute, embouchure, flute embouchure, flute pedagogy, flute tone

Because there are so many variables involved in flute embouchure, there are an infinite number of problems that students can manifest in their tone quality and intonation. And as instructors it might seem we have to virtually be psychic to deduce the problem and offer solutions to our students. This is because so much is affected by things going on in the body that aren’t obvious from looking at a kid. Over the years I’ve been collecting a laundry list, so to speak, of tone/intonation problems and their solutions. Here are some common ones for beginner to intermediate students.

dsc_0968Problem: Windy, airy tone that is sharp

Solution: The aperture is too large and the blowing angle is too shallow. Blow through a smaller aperture and angle the air down more. You can achieve a steeper blowing angle by putting the flute lower on the bottom lip and reaching over with the top lip more, while maintaining the smaller aperture. The Legend of Kiss and Roll, Independence for Lips!

Problem: Dull tone quality, flat pitch

Solution: There is too much bottom lip covering the blow hole, and the flute is probably too high on the bottom lip. Move the flute lower on the bottom lip and roll out. There shouldn’t be more than 1/3 of the blow hole covered by the bottom lip. Also check alignment of the headjoint and balance of the flute. That alone can cause a student roll in and cover too much of the blow hole. It’s All About Balance

Problem: Strangled or pinched tone, can be flat or sharp depending how high or low the flute is on the bottom lip

Solution: This requires some sleuthing on your part because you have to identify the source of the constriction. There are at least four places I can think of that cause a pinched sound: 1) The lips themselves with a flattened and pinched aperture, 2) clenching the jaw with teeth too close together (common with kids who have braces, especially with rubber bands), 3) the back of the tongue is too high, constricting the airway, and finally, 4) the kid can actually be closing off the throat itself, as in activating the gag reflex. It takes some practice and discernment on your part to tell the difference which of these four constriction points are causing the problem. I can tell you that each one has a distinct quality that identifies it from the others, but it does take carefully listening and practice to recognize each one. Getting the Cart Before the Horse

Problem: Trouble producing third octave notes even with the correct fingerings

Solution: Third octave notes seem scary to kids. To them it seems like the natural thing that in order to control the third octave, they should roll in and pinch. After all, who wants to hear screeching high notes? This is precisely why they are having trouble. The solution, paradoxically, is to open up the blow hole a bit, support the air column more from the body core, and relax the grip of the aperture slightly. The speed of the air column itself will ensure the high note speak with ease. Warm Air, Cold Air

As always, if you find these entries useful, please subscribe, share with your colleagues and come back regularly. Feel free to comment. If you have a topic you would like to see explored more fully, you can contact me via IM/Messenger on Facebook or email me at dr_cate@sbcglobal.net. For information about clinics, workshops and performances, click here.

Flute Go Juice

08 Sunday Jan 2017

Posted by Dr. Cate Hummel in embouchure, Flute pedagogy for band instructors, technique, vibrato

≈ 1 Comment

Tags

articulation, dynamics, embouchure, flute pedagogy, vibrato

dsc_9393We have spent a great deal of virtual ink on this blog exploring flute embouchure, articulation, intonation, technique, dynamics and vibrato. While all of these things are essential to good flute playing, we’re overlooking the elephant in the room, namely blowing. Indeed, if you don’t have good mastery of blowing, you aren’t going to be able to articulate well, play in tune, control dynamics or play with vibrato. All the blah, blah about embouchure is meaningless if you are not moving air through the embouchure into the flute. Technique is worthless without the air behind the fingers.

A few thoughts about blowing as it relates to teaching kids, in no particular order:

  • Beginners – give me a kid with an enthusiastically windy sound any day over a kid that is timidly tweeting little peeps. It is much easier to help the first kid refine their sound and become more precise with how they direct their air than to get that shy kid who is barely making any sound to actually put some air into the instrument.
  • Students who come to the flute from a piano background often have to be cajoled into blowing more. My conjecture about this is that they are used to thinking of the sound being generated by their finger technique. You need to help them understand their fingers make very little sound , but that their go juice on flute is the air stream.
  • Hold off on teaching/expecting dynamics until you are sure the student has sufficient mastery of steady blowing to be able to understand the difference between air speed and air quantity. Getting to this point can take up to a couple years, depending on how much they play in band/practice on their own.
  • Encourage your students to blow freely and refrain from using what my teacher, Tom Nyfenger, called the nay-palm, shushing your young flute players in the front row to hear the brass line behind them. The flutes are not impacting the balance of the ensemble they way you think they are. The reason they sound loud to you is they are sitting right under your baton. This is so incredibly damaging to developing young flute players. The truth is, a flute will never be able to compete in terms of volume of sound with most any other instrument in your ensemble, not a trumpet, a saxophone or even a clarinet. By shushing them and not instructing your flute players how to play more quietly, the kids develop all kinds of negative compensating behaviors such as pinching the aperture, squeezing in the throat, clenching their teeth and just not blowing. The consequence is that the flutes sound terrible and have horrendous intonation problems. These problems are then compounded if you then tell them to roll in or out to fix the pitch. All of these problems with evaporate if you encourage your students to blow in the first place.
  • If your students know how to blow well, learning to play with vibrato, developing lively articulation and meaningful technique is part of a natural progression of acquiring skills. Good blowing and a steady, supported air column facilitate all these skills. You have to have the go juice first.

As always, if you find these entries useful, please subscribe, share with your colleagues and come back regularly. Feel free to comment. If you have a topic you would like to see explored more fully, you can contact me via IM/Messenger on Facebook or email me at dr_cate@sbcglobal.net. For information about clinics, workshops and performances, click here.

Top 10 Posts of 2016 on Dr. Cate’s Flute Tips

31 Saturday Dec 2016

Posted by Dr. Cate Hummel in embouchure, Flute pedagogy for band instructors

≈ Leave a comment

Tags

embouchure, flute pedagogy

Thank you for reading this blog! There has been a 44% increase in readership over that of 2015 thanks to you. Most of the articles in the top 10 for 2016 are, not surprisingly about different facets of flute embouchure. If you are used to relating to a mouthpiece of some kind, it is no wonder the range of variables that make up a good flute embouchure can be baffling. Perhaps the closest equivalent in instrumental music is with all the variables involved in playing string instruments, with the bow and with the left hand.

Without further ado, here are the top 10 posts of 2016 on Dr. Cate’s Flute Tips:

  1. Teaching your Students to Play with Vibrato
  2. Flute Embouchure and a Teardrop Top Lip
  3. To Roll or Not to Roll: That is the Question
  4. Intonation and Dynamic Control
  5. Helping Your Students Adjust to Playing With Braces
  6. About the Third Octave
  7. Teaching Great Flute Sound
  8. Solutions for Common Third Octave Problems
  9. The Legend of “Kiss and Roll”
  10. Our Lips are our Mouthpiece

As always, if you find these entries useful, please subscribe, share with your colleagues and come back regularly. Feel free to comment. If you have a topic you would like to see explored more fully, you can contact me via IM/Messenger on Facebook or email me at dr_cate@sbcglobal.net. For information about clinics, workshops and performances, click here.dsc_7981

Shaping a Flute Aperture

18 Sunday Dec 2016

Posted by Dr. Cate Hummel in beginners, embouchure, Flute pedagogy for band instructors, intermediate skills, tuning

≈ 5 Comments

Tags

beginning flute, embouchure, flute pedagogy, flute tone

It seems to me that understanding how to shape a flute aperture with your lips is likely the biggest mystery for non-flutists who teach beginning flute players. Surprisingly, this is one of the simplest concepts to grasp if you know the trick. The trick is to shape your lips as if you are saying the sound of the letter “W”, as in “what” or “wonderful”. Notice a few things when you do this:

  • Your awareness is focused on the middle of your lips, almost as if you are gripping a drinking straw
  • The corners take care of themselves and seal themselves. No attention needed
  • Your lips naturally form an elliptical opening
  • The perimeter of the resulting aperture is actually rather firm

For yourself and your students, try starting out without a flute headjoint. Put an index finger under your lip and say, “what” or “water” a number of times. Then shorten it and say “waaaa”. Then just shape your lips for the “W” sound and blow through the resulting opening. Voila! Flute aperture 101.The next step is to shape your lips and tongue behind the teeth where gum and teeth meet on the top while blowing through the aperture, “too, too, too……”, keeping a steady air stream. Finally, go through the above process with a flute headjoint on your chin.

dsc_9565Of course there is more to getting a characteristic sound than just shaping the aperture. And there are seemingly more variables than specific immutable features to making a good sound. Pretty much the headjoint itself is the only constant. People, their lips, size of their teeth and oral cavity are unique to themselves. Remember to:

  • Bring the flute up to the bottom lip from below to rest where the chin and lip meet. Adjust up a little for a very full bottom lip, adjust down for a thin bottom lip. Avoid the so-called kiss and roll because this puts the flute too high on the bottom lip for everyone. It’s a one size fits all solution that fits no one. The sound will be thin, light and probably sharp.
  • Keep the blow hole open approximately two thirds. This is easier to do if the flute is a little lower on the chin than higher for most people. Having any more of the bottom lip in the blow hole than 1/3 will make a stuffy, dull and flat sound.
  • The corners will take care of themselves, provided your lips are shaped as if to make the “W” sound. Really! Try for yourself.
  • Roll your bottom lip (not the flute!) out a little to go up the octave or raise the pitch. Reach over a little with your top lip to play low notes or lower the pitch.

As always, if you find these entries useful, please subscribe, share with your colleagues and come back regularly. Feel free to comment. If you have a topic you would like to see explored more fully, you can contact me via IM/Messenger on Facebook or email me at dr_cate@sbcglobal.net. For information about clinics, workshops and performances, click here.

← Older posts

Top Posts & Pages

  • Everything You Ever Wanted to Know About Trills
  • Common Ornaments in Flute Music
  • Flute Embouchure and a Teardrop Top Lip
  • Quick Fixes for Common Mechanical Problems
  • Solutions for Common Third Octave Problems
  • It's All About Balance
  • Why do my Flutes Sound Thin and Squeaky in the Third Octave?
  • The Secret of Tuning Db (C#)
  • Flute Balance and the Right Hand
  • A Brief Guide to Step-up Flutes

Categories

Copyright notice

© Dr. Cate Hummel and Dr. Cate’s Flute Tips, 2014-2020. Unauthorized use and/or duplication of this material without express and written permission from this site’s author and/or owner is strictly prohibited. Excerpts and links may be used, provided that full and clear credit is given to Dr. Cate Hummel and Dr. Cate’s Flute Tips with appropriate and specific direction to the original content (link back to Dr. Cate’s Flute Tips).

Enter your email address to subscribe to this blog and receive notifications of new posts by email.

Join 1,012 other subscribers
Follow Dr. Cate's Flute Tips on WordPress.com

Blog at WordPress.com.

Privacy & Cookies: This site uses cookies. By continuing to use this website, you agree to their use.
To find out more, including how to control cookies, see here: Cookie Policy
  • Follow Following
    • Dr. Cate's Flute Tips
    • Join 260 other followers
    • Already have a WordPress.com account? Log in now.
    • Dr. Cate's Flute Tips
    • Customize
    • Follow Following
    • Sign up
    • Log in
    • Report this content
    • View site in Reader
    • Manage subscriptions
    • Collapse this bar
 

Loading Comments...