All about the Headjoint Cork

Tags

, ,

Recently, one of my private students reported that their band director had told all the flutes in band that you could adjust the cork placement for tuning purposes, rather like a tuning slide on a brass instrument. I would like to know where this idea originated in music education literature and pedagogy. It can be said with certainty that flute makers and professional flute teachers kindly wish that the cork assembly be put in the proper position and then left alone. Tell the kiddies to keep their hands off the crown. If the crown is loose, it should be gently snugged down and left alone. Why? Because the flute will play in tune at the pitch it was designed for, i.e. A=440 or A=442 (most flutes today at every price point are designed to play at A=442).

Piccolo and flute cleaning rods with cork measurement lines
  • What is the ideal placement of the cork assembly in the headjoint? 17 mm (I have a cleaning rod that says 17.3 mm, but I honestly don’t know how you could place it with that kind of precision without a special caliper) and for piccolo, it’s 8 mm. Basically, the line on the cleaning rod should be dead center of the blow hole.
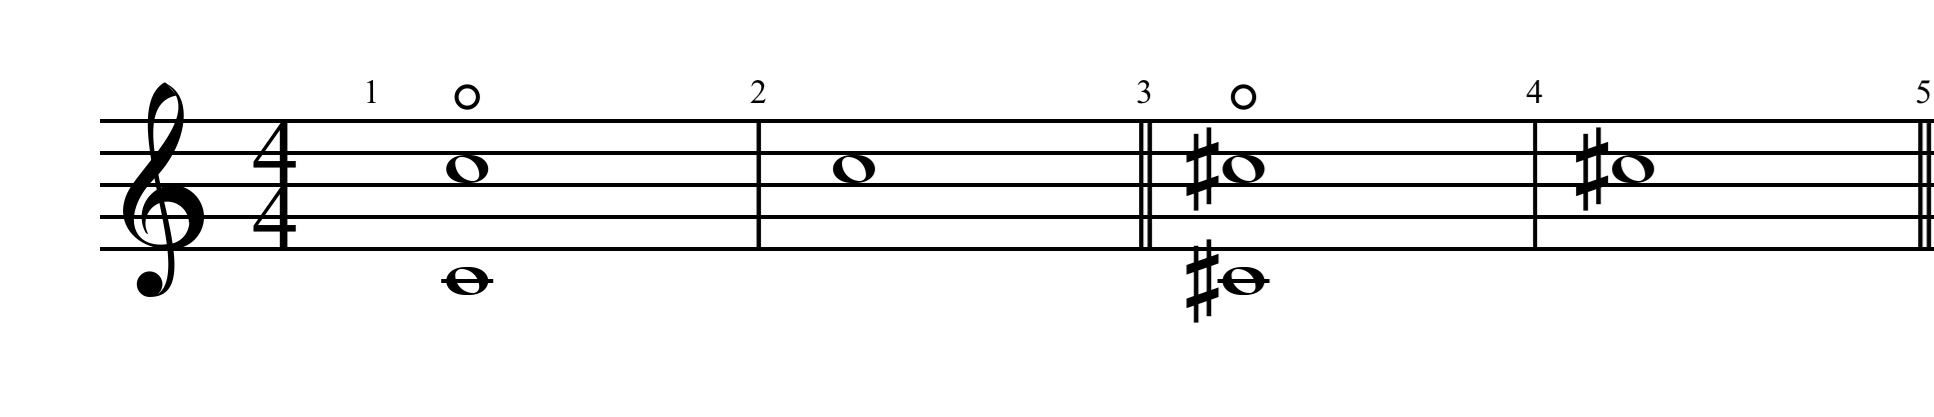
  • What happens if you move it away from the ideal 17mm placement? If the cork assembly is too close to the crown, the high notes will be more flat and the low notes will be more sharp. The more you move it, the more out of tune the scale becomes. Conversely, if the cork assembly is too close to the blow hole, the high notes will be more sharp and the low notes will be more flat. (This was precisely the problem with the pre-Cooper/Bennett scale flutes. The headjoint was too short for the body, which was tuned to A=435. The intonation was horrendous). See Tuning Tendencies of the Flute
  • The flute already has a “tuning slide”, otherwise known as a headjoint tenon or receiver (in flutemaker parlance). The flute is designed to play at it’s manufactured scale with the headjoint pulled out 5-6 mm or ~1/4 inch. If the student is having to pull out much more than that to play in tune, or can’t push in far enough to get up to pitch, the issue is with how the flute is resting on the lip and the angle of blowing. See Troubleshooting Tone and Pitch Issues

Now, about the cork itself. Cork is the bark of a special kind of oak tree that grows in Portugal. It has been used to seal small openings, like wine bottles and other stoppers for centuries. When compressed, it expands to create a tight seal, hence it’s use in flute headjoints and for wind instrument tenons. It is often additionally sealed into place with paraffin wax. As a cork ages in a flute, it can shrink because it loses it’s natural moisture or develop mold if the flute headjoint isn’t swabbed out sufficiently. If the cork shrinks, it can start moving up toward the crown. The student progressively tightens the crown (because it is loose) and moves the cork up to the top of the flute (which compresses the cork further and negatively impacts the intonation as described above). At this point, or if the cork is moldy, it should be replaced. Some repair people recommend replacing a cork every couple of years as a matter of course. They are cheap and take only few minutes to replace.

Finally, it can be well worth it to experiment with replacements for cork stoppers. Personally, I stopped using cork in my headjoint 5-6 years ago now. I use the Celestine Rexonator in most of my instruments, including piccolo and alto flute. It’s made of solid brass and fits over the stem assembly. It seals in with a small plumbing gasket. It’s very easy to install. It adds a world of resonance and response to the flute, improves the quality of articulation and also changes the balance of the flute in one’s hands slightly because it weighs an extra ounce or so. There are a couple other companies out there that are now offering similar devices. Also, there are stoppers made of Delrin plastic or that just leave the cavity above the assembly plate open. They all make sense in that cork is an acoustic dampener. Taking out the cork and using a more resonant material has a measurable effect on the sonic signature of the flute.

As always, if you find these entries useful, please subscribe, share with your colleagues and come back regularly. Feel free to comment. If you have a topic you would like to see explored more fully, you can contact me via IM/Messenger on Facebook or email me at dr_cate@sbcglobal.net. For information about clinics, workshops and performances, click here. Dr. Cate’s Flute Tips will be available soon in book form. Manuscript is done and editing is underway. Stay tuned for updates about pre-ordering through Amazon soon.

Lining up the Flute Foot Joint

What do you tell your students about how to line up the foot joint on the flute body? After all, there isn’t a clutch, as with the clarinet middle joints, linking the two parts together that dictates how to line them up (well there can be a clutch, but it’s a really rare option on handmade flutes, if there’s an extra left hand pinky lever for the foot joint keys). My approach is super simple and seems to me like a common sense approach.

There are two types of flute foot joints that are standard, a C foot (most beginner instruments, as well as common on higher level flutes in Europe and Asia) and a B foot (which is generally preferred for step-up and handmade flutes, at least in North America). The width of the foot joint cluster is wider, front to back, on a B foot than on a C foot, which changes the standard alignment slightly.

This is a C foot joint. Notice how the rod and ball of the foot joint post is aligned with the middle of the D key on the body.
With this B foot joint, line up the rod and ball of the foot joint post with the ring around the open hole of the D key. Notice how much wider the cluster is from front to back because of the extra roller (and yeah, the roller on the Eb key of my Altus is pretty sweet).

Keep in mind that this is a place to start with lining up the foot joint with the body. You also have to consider the size and shape of the player’s hands and fingers. People with long fingers will be fine with this set up. If the student is small or has short fingers, you need to advise them to turn the foot joint back a bit beyond the alignment shown in these photos. What is important is that the right hand is behind the flute, the fingers are gently curved and the pad of the little finger rests squarely in the middle of the Eb key.

As always, if you find these entries useful, please subscribe, share with your colleagues and come back regularly. Feel free to comment. If you have a topic you would like to see explored more fully, you can contact me via IM/Messenger on Facebook or email me at dr_cate@sbcglobal.net. For information about clinics, workshops and performances, click here.

Dr. Cate’s Flute Camp goes Virtual

Tags

We’ve been doing Dr. Cate’s Flute Camp the old-fashioned way for 20 years in a school, at a music dealer, in person. Now due to the world being a completely different place since March, Dr. Cate’s Flute Camp is going virtual. And you know what? I’m really excited for this new opportunity to help keep students playing their flutes, give them some ensemble experience, explore the basic skills of good flute playing, learn about different types of flutes from around the world, and learn how to properly take care of their instruments.

Instead of the full day format we’ve had in the past, we are condensing the instructional part of the day down to two hours. During the course of each one week camp, each student will also get a 30 minute lesson from one of our highly qualified staff. We are also expanding the number of available sessions to three for junior high students and three for high school students, starting the week of May 18.

If you or your students can benefit from an online camp experience over the summer, go to fluteline.com and follow the links to Dr. Cate’s Flute Camp and the easy online registration. You can read all about our award winning staff and learn more about our camp activities. Price for each session is only $100.

The Antidote for Fake-arando

Simply put, the antidote is to have a long term strategy for your ensemble so that your woodwinds develop the necessary technique to play fast passages and runs with accuracy and clarity. Then they won’t need to fake. What this means in practical day-to-day terms is to have technical warms ups for your flutes and other winds to incorporate into your daily rehearsals. It also means, at least in terms of your flute players, that you will need to monitor and evaluate their hand positions and posture on an ongoing basis. It’s really important to note that developing facile technique is so dependent on having the flute balanced in your hands rather than holding the flute. See drcatesflutetips.wordpress.com/2016/01/17/flute-balance-and-the-left-hand/ and drcatesflutetips.wordpress.com/2015/10/11/flute-balance-and-the-right-hand/

For the newest flute and woodwind players, a completely realistic goal for the first year is to make it a priority that they can play five note scales, one octave arpeggios in all twelve keys in quarter notes and eighth notes, and F and Bb chromatic scales one octave in quarter notes. You can make this part of your assessment testing with SmartMusic or any other method you choose.

By their second year of playing, they should be learning full octave scales, tonic and dominant arpeggios in all twelve keys, as well as be able to play a one octave chromatic scale starting on any note. At this point I think it is really important to introduce material for solo and ensemble that is in keys other than the traditional band keys for flute, i.e. F, Bb, Eb, Ab. Have them play solos and duets in C, G, D, A. The kids will be able to play harder music sooner with a foundation of playing in more than just band keys.

When students have been playing for three years, they are ready for the well-known band technique books like Williams and King Foundations for Superior Performance, and Rush and Moon Habits of a Successful Musician. Both these books are in SmartMusic, so you can gradually increase the speed on these exercises while monitoring for clean technique and balanced hand positions. Especially important for developing good technique are scales two octaves in all keys, arpeggios two octaves and chromatic scales in eighth notes and triplets. Teach the students to listen for clean combinations like C to D, C# to D, Eb to F, E to F#, Ab to Bb (using thumb Bb or 1 and 1 Bb). Then there are larger intervals, especially G to Bb, F to A, F# to A, F to A (pretty much any interval that is using fingers from both hands at the same time), D to F, D to F#.

By the time wood students are in high school, they should have a personal practice routine that includes technique practice, tone studies and articulation exercises. Both the Foundations book and the Habits book are a great basis for this personal practice. I also strongly recommend practicing fast five note scales through the entire range of the flute. See the link below. These are great preparation for the kinds of fast scale rips that are common in ensemble music. It is also great practice to play one octave scale rips as fast as possible, starting on each note of a scale in all keys.

As always, if you find these entries useful, please subscribe, share with your colleagues and come back regularly. Feel free to comment. If you have a topic you would like to see explored more fully, you can contact me via IM/Messenger on Facebook or email me at dr_cate@sbcglobal.net. For information about clinics, workshops and performances, click here.

Fake-arando is Not a Thing

Tags

, , , ,

Sometime last school year, one of my private students was learning the Poulenc Sonata for flute and piano. If you are familiar with the piece, you know that there are at least five 32nd note runs that the flute does together with the piano in the first movement. When she got to the first run, she played the first couple notes, did some kind of faking in the middle of the run and played the last couple of notes. Inside, I was flipping out. What’s this? I never told her she could or should fake this run. It’s not that hard to play correctly, etc.

So I asked her about what she did in the most neutral way I could summon, why she wasn’t playing all the notes in this run, but in fact, faking it. Her answer elicited an even stronger reaction from me than just the fact that she was faking to begin with. She told me that her middle school band director had told her that was how to handle runs as a general rule! She had been told not to worry about the notes in the middle of the scale, just hit the bottom and top and you’re good. And this is a student who, herself wants to be a music educator.

A few thoughts about teaching kids good technique:

  • It impacts the quality of the entire ensemble when you let your woodwinds fake fast runs and scale rips.
  • It does kids a huge disservice to let them or even encourage them to fake their technique, both in their ensemble playing and when they begin working on solo repertoire.
  • If you only ever test kids on playing scales in eighth notes at mm=80, they will never develop the ability to play rip scales that are so much a part of woodwind writing in concert band music
  • Include technical work for your students both as a section and individually into your curriculum.
  • There are vast resources available through traditional band methods, band technique books and online resources you can use with your students with very little effort on your part

Technique resources that I like from the band world include the huge library of scales, arpeggios and wiggles in SmartMusic. Foundations for Superior Performance and Habits of a Successful Musician both have excellent technical exercises. Then, of course in the flute realm, there are a wealth of great technique books including Trevor Wye’s Practice Books Omibus edition and Complete Daily Exercises, Patricia George’s The Flute Scale Book, and of course the venerable Taffanel and Gaubert 17 Big Daily Exercises

Personally, I’m not a fan of scales that have an 8th note followed by seven 16th notes. I don’t really think this type of scale teaches technical fluency. What I do like are five note scale patterns in every key including sharp keys, scale rips starting on each note of a scale, scales that cover the full range of the instrument (for more advanced players).

As always, if you find these entries useful, please subscribe, share with your colleagues and come back regularly. Feel free to comment. If you have a topic you would like to see explored more fully, you can contact me via IM/Messenger on Facebook or email me at dr_cate@sbcglobal.net. For information about clinics, workshops and performances, click here.

The Secret of Tuning Db (C#)

The truth is that if your students can learn to correctly place Db (C#), their overall tone will improve exponentially and they will be able to play with better intonation throughout the range of the flute. The obvious question then is how to teach this to your flute students?

Start with making sure your students have a good physical set up with the flute:

Next, have your flute students finger the lowest C and play the harmonic one octave higher. The harmonic is at correct pitch. Now match the pitch of the normal fingering to the pitch of the harmonic. Do the same with the Db/C#. First play the first harmonic of the low Db/C# and compare the pitch to the open/standard fingering for Db/C# on the staff. You will notice that the pitch of the normal fingering will be quite a bit higher than the harmonic. The tone will likely sound thinner and more airy. The way to get the pitch between the harmonic and normal fingering to match is reach out with the top lip and direct the air down more into the blow hole. Keep the blowing aperture small. Practice going back and forth between the harmonic and regular fingering slowly and learn to adjust the blowing angle until the harmonic and regular fingering are at the same pitch. You should notice that the tone will develop more body and be more focused.

A word about older scale flutes (read older mainline American band instrument brands). The scale (placement of the tone holes) is calibrated lower than A = 440-442 Hz. The headjoints were shortened to make the A in tune at 440 or 442. Consequently, the low register is flat and the third octave is sharp. The exercise above is helpful on any flute, however, there are some old tricks that you will want to try to see if you can improve the pitch even further on these old scale flutes. 1) Pull the footjoint out a couple of millimeters. 2) Add right hand fingers to flatten the C and Db/C#. You can do one, two or three, starting with the D key, so it would be D, E and F, in that order. Just see what works. Neither of these tricks should be necessary on modern scale flutes.

As always, if you find these entries useful, please subscribe, share with your colleagues and come back regularly. Feel free to comment. If you have a topic you would like to see explored more fully, you can contact me via IM/Messenger on Facebook or email me at dr_cate@sbcglobal.net. For information about clinics, workshops and performances, click here.

The Top 10 Blog Posts of 2017

It’s been a banner year at Dr. Cate’s Flute Tips, nearly doubling the number of views of the previous three years just this year alone. There are now 100 different articles on all aspects of embouchure, tone production, hand and body position and teaching beginners. There are more new posts coming up in the new year. Your suggestions and comments are always welcome. With no further ado, the top ten posts for 2017 are:

  1. Flute Embouchure and a Teardrop Top Lip – It’s great that this is the number one post. My hope is that it means more kids will have the opportunity to play the flute rather than being talked out of it because they have a prominent teardrop and need to shape the aperture off-center.
  2. Teaching Your Students to Play with Vibrato – I believe in waiting a year or two before introducing vibrato to young students. The most important thing is the kids are blowing strongly and have a well shaped embouchure before attempting to learn vibrato
  3. Helping Your Students Adjust to Playing with Braces – Always a big issue for junior high and high school kids. Not as big a deal as if they play a brass instrument. It’s just a matter of reevaluating the blowing angle to re-establish their characteristic tone
  4. The Legend of “Kiss and Roll” – This teaching “method” needs to disappear. If there is any one thing that is an obstacle to developing a rich, characteristic sound, it is learning to blow on the flute by rolling it down into place rather than bringing it up from below. Ask your resident flute teacher/player
  5. About the Third Octave – If you teach your students to maintain the size of the aperture and keep the blow hole sufficiently open, 60-75%, and blow fast enough air (different than quantity of air) at every dynamic, the third octave will be easy
  6. To Roll or Not to Roll: That is the Question – If students learn to change the blowing angle rather than rolling the flute, flute players around the country and the world will play more easily in tune. Rolling has such a negative impact on tone quality, as well as pitch
  7. The Very First Notes – The truth for flute players is that if you develop a strong, focused low register first, the second and third octaves will be a breeze to learn and playing in tune will happen more naturally. I’m well aware that the major band methods start in the middle and work outwards, but the flute is a different beast than the other winds and brass
  8. Finding the Sweet Spot – There isn’t a one size fits all solution for embouchure and tone production with the flute. Teach your students how to experiment with the parameters of blowing angle and placement on their lip and they will develop a characteristic sound more quickly
  9. Everything You Ever Wanted to Know About Trills – When I do sectional rehearsals and clinics, it makes me nuts that kids will just wiggle whatever rather than go through the process of understanding what note is being trilled to which note, either a whole or half step, depending on the key. Teach them to use a trill chart
  10. Warm Air, Cold Air: Sense or Nonsense – Along with rolling to correct intonation and the “Kiss and Roll”, the warm air/cold air explanation for low and high notes is one of the silliest and least true thing we tell kids about how blowing on the flute works. It’s simple. If the aperture is open enough for the air to be warm, the air is moving too slowly to make a good sound. It will be fuzzy and unfocused.

Thank you for reading Dr. Cate’s Flute Tips. It is so gratifying to hear from all of you that you find the blog useful to you. New things in development include some more posts on pedagogy, products I endorse and use in my teaching and playing, a book of tone and technique exercises just for band flute players that can be used in sectionals and individual home practice, and industry sponsorship. Dr. Cate’s Flute Tips would not be possible without the support of KHS America and their flute brands: Altus, Azumi and Jupiter flutes.

As always, if you find these entries useful, please subscribe, share with your colleagues and come back regularly. Feel free to comment. If you have a topic you would like to see explored more fully, you can contact me via IM/Messenger on Facebook or email me at dr_cate@sbcglobal.net. For information about clinics, workshops and performances, click here.

Taming the Beast

Tags

, ,

Intonation on Piccolo

Over the last few weeks, students have been asking me for help with piccolo. For such a diminutive instrument, pitch awareness and placement is a huge issue. It might even be the biggest issue because so much of what we know about playing the flute translates directly to piccolo. Here are a few tips to help your students play better in tune on piccolo:

  • Make sure the piccolo the student is playing is in good repair. In my experience, school piccolos are notorious for being in the worst condition of any instruments in the storage locker. They have shredded pads, bent keys, plating flaking off the keys…you name it. They rarely see the inside of a repair shop and often are unplayable.img_3254
  • Check the headjoint cork placement. This is probably the #1 problem with student flute players playing piccolo out of tune. Make sure to use a piccolo cleaning rod for the correct measurement. The line should be in the middle of the blow hole.
  • Have the cork replaced if it moves easily. A leaking cork will cause a lot of pitch problems.
  • Be sure that your piccolo players have the most stable and developed embouchure in your ensemble. They need to know how to correct pitch and use their air properly on flute to know how to begin to explore piccolo without causing more problems than they solve.
  • You need to put the piccolo a little higher on your lip than the flute. Because of the small size, issues of placement are magnified. In other words, smaller adjustments will mean larger changes in pitch and tone quality
  • Playing octaves will teach the student what in tune means on the piccolo. The pitch tendencies are a bit different than flute. This is especially noticeable in the notes just above the staff like Bb, B, C, C# and D. This can also be the case with long notes on the staff like D, Eb and E. Another way to practice pitch is by using a tone generator and playing intervals like perfect 4ths and 5ths against the drone.
  • Make sure to make adjustments by moving your lips independently. Rolling your bottom lip out will raise the pitch, using your top lip to angle the air down will lower the pitch just as on flute. The movements are more subtle and require you listen carefully.
  • If rolling the instrument to adjust pitch is a bad idea on flute, it is an even worse idea on piccolo. Remember, everything, both good and bad, is magnified on the piccolo. You could even say, “less is more”. A smaller change makes a bigger difference.

As always, if you find these entries useful, please subscribe, share with your colleagues and come back regularly. Feel free to comment. If you have a topic you would like to see explored more fully, you can contact me via IM/Messenger on Facebook or email me at dr_cate@sbcglobal.net. For information about clinics, workshops and performances, click here.

Do’s and Don’ts of Flute Care and Feeding

Tags

Helping our students take proper care of their instruments is an important part of the instruction we provide, especially when the kids first start playing. It is important to give the kids accurate information so flutes play their best.

File_000 (2)

Headjoint and flute body

  • Use a soft cotton, silk or microfiber cloth as a swab. The flute should be thoroughly swabbed after every use. Thread a corner of the cloth through the slot on the cleaning rod and run it through the body and footjoint. Fold the cloth over the end of the cleaning rod and gently push it all the way into the headjoint and then rotate the cleaning rod to thoroughly dry the headjoint out.
  • Use a clean microfiber cloth (different than the swab cloth) to gently wipe off fingerprints on the flute. Avoid coming in contact with the pads. They can tear and fray with friction.
  • The lip plate can be wiped with isopropyl alcohol or “green juice” to disinfect as needed. Once every month or two, dip a cotton swab in isopropyl alcohol and wipe gently inside the blow hole. The tops of the keys can also be wiped with an alcohol prep pad and open holes cleaned with alcohol and a cotton swab. Be careful to keep the alcohol away from the pads, since it will dry out the pad skins.

Tenons

  • Do keep the tenons squeaky clean. It is a friction fit that shouldn’t need any lubrication. I use alcohol prep pads to clean oil and dirt off the tenons. You can also use paraffin wax (apply liberally, put the pieces together, twist gently back and forth, take apart and thoroughly wipe off the tenon of both pieces with a soft cloth)
  • For piccolos with a cork tenon, do use a little cork grease once in a while when there is resistance when assembling the instrument. This is similar to clarinets and oboes
  • Don’t ever use petroleum jelly or slide oil on the tenons of flutes or piccolos. It just makes a gummy mess. The petroleum jelly attracts dirt and gets thick and gummy. I saw a wooden school piccolo recently that someone had put petroleum jelly on the cork. Yuck! It was a mess to clean up.
  • Using pencil graphite on tight tenons. This one can be controversial with some people saying yes and others no. Trevor Wye, the internationally know flute pedagogue showed me this trick. Clean the tenons thoroughly as above. Take a pencil with a soft lead and gently trace circles on both surfaces of the tenon. Put the pieces together and twist gently back and forth a few times. Take the pieces apart and wipe with a soft cloth. My experience is this is a temporary fix only and only on beginner or intermediate flutes
  • For loose footjoint tenons, a small swipe of clear nail polish on the body tenon (let it dry thoroughly before assembling) will hold a loose tenon temporarily until it can be properly adjusted by a repair technician.
  • Best solution for ill fitting tenons is keep them clean and have it adjusted by a repair technician.

Mechanism

  • In a pinch, check out Quick Fixes for Common Mechanical Problems. These are a few things I’ve picked up over the years that teachers can try until the flute can go to the shop for proper repair.
  • Leave oiling the mechanism up to the pros. This is absolutely not something students should be attempting on their own.
  • Bent keys – again, best to leave this for a qualified repair person.

Pads

  • Do swab the flute out thoroughly after playing. Also do blot the pads with tissue paper or use a product like the BG Pad Dryer, especially if you blow wet, like I do.
  • Don’t ever pull tissue paper or a BG Pad Dryer out from a closed key. You will rip and/or fray the pad skin necessitating pad replacement.
  • Don’t ever use a dollar bill to blot sticky pads and don’t pull them against a closed key like above. The ink just makes the pads dirty, or worse, rips or frays the pad skin.
  • Yamaha Powder Paper can be useful for sticky pads if used sparingly. Pads tend to get sticky with the change of seasons or humidity. A few judicious gentle blots can go a long way. Some techs don’t like them because they say the powder clogs the pores in the pad skin
  • So called Pad Savers. If they are used to swab the instrument, they should not be stored inside the instrument. Pads deteriorate faster because they hold the moisture in the instrument. The Pad Save gets moldy. If the flute is swabbed with a cloth first, then the Pad Saver can be stored in the flute.

One more big don’t…..Don’t store your cleaning rag in the case, pushing down on the keys. It will put the instrument out of adjustment more quickly. Ask your local repair technicians. Tie the rag to the handle of your case, or better yet, get a case cover. Store the cloth in the case cover.

As always, if you find these entries useful, please subscribe, share with your colleagues and come back regularly. Feel free to comment. If you have a topic you would like to see explored more fully, you can contact me via IM/Messenger on Facebook or email me at dr_cate@sbcglobal.net. For information about clinics, workshops and performances, click here.

Never Mind About Support

Tags

“What??? But, but…….how can a wind instrument sound good without support?” That’s not what I’m saying at all. I’m saying we need to stop paying attention to “support” as a concept. Let me ask you a few questions. If I tell you to support your sound, what do you do? Can you explain what you are doing or how you are doing it? What is your definition for “support”? How do you explain “support” to your students? What do they do in their attempts to follow your instruction?

First, my observations about flute students who have been told to “support”.

  • They are pinching the aperture, squeezing their lips
  • They are clenching in their throat
  • They are generally tense in their shoulders, torso, even in their hands and wrists

Secondly, here’s my definition for “support”. Simply put, it is having body energy behind the blowing. It involves using abdominal muscles, pelvic muscles and intercostal muscles of the rib cage. In other words, its a full body activity.

DSC_3214
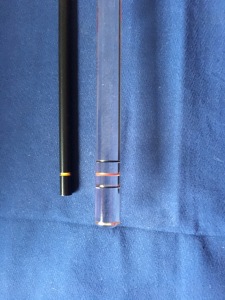
Rather than talking about “support”, let’s talk about blowing. If I say, “Blow fast (or faster) air,” do you understand what you need to do? Do you think students will know what they need to do if you give them that direction? If the air is moving sufficiently fast, the tone will be supported automatically. Support is the consequence of blowing quickly enough. All those supporting muscles are engaged in the process of blowing. You don’t need to “do” anything else besides blow with sufficient air speed to have a supported sound.

Beyond blowing sufficiently quickly enough, there are, of course all the issues of finding the right placement on your chin, having the blow hole open just the right amount, shaping the aperture, blowing at the correct angle for the register you are playing and so forth. But a lot of these issues will largely take care of themselves if the student is blowing fast enough air to begin with. So encourage your students to blow faster air.

Finally, air speed is different than air quantity. You can blow a lot of air through a large aperture and nothing will work well because the air isn’t moving fast enough. Not low notes (they will be wooly and unfocused), not the middle register because it will keep dropping down the octave, and not the third octave because it will either be so pinched as to not speak at all or keep dropping down to a lower partial. With the correct air speed and direction a flutist can play rich, focused low notes, have a clear, singing middle register, and be everything from heroic to ethereal in the third octave. It all starts with sufficient air speed. The rest comes through refining the direction of the air and sensitivity and flexibility of the aperture.

As always, if you find these entries useful, please subscribe, share with your colleagues and come back regularly. Feel free to comment. If you have a topic you would like to see explored more fully, you can contact me via IM/Messenger on Facebook or email me at dr_cate@sbcglobal.net. For information about clinics, workshops and performances, click here.